あると良いなーと思ったので.protoファイルからTypeScriptのインターフェースを生み出すプラグインを作りました。
実のところJavaScriptを生み出すものが公式に存在していますが、それは後述するgRPCなのでちょっと困るのです。
ProtocolBuffersとは
ProtocolBuffersというのはGoogleが作ったAPIのためのスキーマの定義方法です。
これによって環境によらず同一のファイルからAPIの定義〜実装ができるという触れ込みです。
OpenAPIと同じような指向のものですね。
gRPC?
ProtocolBuffersというのは(多分)本来はgRPCという通信方法が前提となっていると思います。
gRPCはHTTP/2を利用して、バイナリによるストリーム配信を行います。
これによって、効率が良いデータ転送ができるという触れ込みです。
デメリット
唯一にして絶対のデメリットがHTTP/2という導入障壁です。
比較的最近に策定されたHTTP/2は各種ミドルウェアなどの対応状況や、ブラウザでの対応状況があまり芳しくありません。
CDNの内部などでは効率的に使えるとは思いますが、弱小サービスではハードルがメリットを上回ってしまいます。
今回作ったもの
今回作ったものは.protoで記述されたProtocolBuffersの定義情報をTypeScriptのinterfaceとfetchを利用した通信処理を行うソースを生み出す、対protoc用のプラグインです。
gRPCではなく、fetchによる旧来のHTTP/1.1による通信です。また、実際の通信処理が無いinterfaceも生み出しますので、型情報だけを使いたいという場合にも有用だと思います。
使用準備
- protocを取得
- goをインストール
- ソースをビルド
1. protocを取得
まずは、肝心のprotocを公式から取得します。
各リリースの下の方に 「protoc-バージョン-OS」 という名前で実行ファイルがありますので、それをダウンロードします。
2. goをインストール
プラグインはgoで書いたのでビルド用にインストールします。
公式ページにインストーラがありますので、それを実行すれば大体終わりです。
3. ソースをビルド
私が作ったソースを取得してビルドします。※私がリリースを用意すれば上記goのインストールと共に不要なのは内緒
こちらのリポジトリのClone or downloadのDownload Zipを選択しソースをダウンロードします。
以下のコマンドを実行してビルドします。 (フォルダは解凍したREADMEとかがある場所です。)
$ go get github.com/golang/protobuf/proto
$ go build plugin/src/protoc-gen-tsi.go
うまくいけば実行ファイル(Windowsならprotoc-gen-tsi.exe)が生み出されます。
実行
- protoファイル用意
- 各種ツール配置
- 実行
- 結果
1. protoファイル用意
ひとまずサンプルにprotoファイルを用意します。
まず、Sample1.protoというファイルを用意してこんな感じに。
syntax = "proto3";

package Sample1;

enum Sample1Enum {
    V1 = 0;
    V2 = 1;
    V3 = 2;
}

message Sample1Input {
    string Vaue1 = 1;
    int32 Value2 = 2;
}

message Sample1Output {
    string Value1 = 1;
    string Value2 = 2;
    Sample1Enum Value3 = 3;
}

message Sample1Output2 {
    int64 Value1 = 1;
}

service Sample1 {
    rpc API1 (Sample1Input) returns (Sample1Output);
    rpc API2 (Sample1Input) returns (Sample1Output2);
}
つづいて別ファイルを参照しているとどうなるかのサンプルSample2.protoを用意。
syntax = "proto3";

package Sample2;
import "Sample1.proto";

message Sample2Input {
    Sample1.Sample1Input Value = 1;
}

message Sample2Output {
    string Value = 1;
}

service Sample2 {
    rpc API1 (Sample2Input) returns (Sample2Output);
}
2. 各種ツール配置
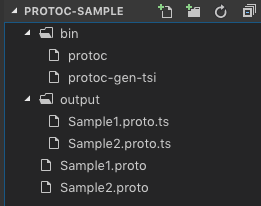
ツールを置きます。こんな感じです。
root
┝ bin
│┝ protoc (公式からダウンロードしてきたやつ)
│└ protoc-gen-tsi (上でgoで作ったやつ)
┝ outut (フォルダ)
┝ Sample1.proto
└ Sampel2.proto
outputの中はツールを実行した結果が入ります。(画像だともう入っていますが……)
3. 実行
ツールを実行します。
$ ./bin/protoc --plugin="protoc-gen-tsi=./bin/protoc-gen-tsi" --tsi_out=./output *.protopluginオプションで今回作成したやつを指定し、–XXX_outを指定します。※XXXのことろにはプラグインの名前(–pluginのところで指定しているprotoc-gen-XXXの部分)を記述します。
Windowsの場合は–pluginのところで.exeの指定が必要かもしれません。
# Windowsの場合は.exeがいるかも
$ ./bin/protoc --plugin="protoc-gen-tsi=./bin/protoc-gen-tsi.exe" --tsi_out=./output *.proto
4. 結果
結果は以下のようなTypeScriptのソースができます。
export const PackageName = 'Sample1';

export enum Sample1Enum
{
    V1 = 0,
    V2 = 1,
    V3 = 2,
}

export interface Sample1Input
{
    Vaue1? : string;
    Value2? : number;
}

export interface Sample1Output
{
    Value1? : string;
    Value2? : string;
    Value3? : Sample1Enum;
}

export interface Sample1Output2
{
    Value1? : number;
}


export interface Sample1
{
    API1(input: Sample1Input) : Promise;
    API2(input: Sample1Input) : Promise;
}

export class Sample1Client
    implements Sample1
{

    constructor(
        private basePath: string
                = '',                                          // default
        private makeUrl: (basePath: string, packageName: string, className:string, methodName: string) => string
                = (b, _, c, m) => `${b}${c}/${m}`,             // =default
        private makeHeaders: (baseHeaders: {}) => {}
                = (h) => h,                                    // =default
        private makeQuery: (baseQuery: {}) => {}
                = (q) => q                                     // =default
    ) {}


    async API1 (input: Sample1Input) : Promise {
        const url = this.makeUrl(this.basePath, PackageName, 'Sample1', 'API1');
        const headers = this.makeHeaders({'Content-Type': 'application/json'});
        const query = this.makeQuery({
            method: 'POST',
            headers,
            body: JSON.stringify(input)
        });
        const response = await fetch(url, query);
        return (await response.json()) as Sample1Output;
    }

    async API2 (input: Sample1Input) : Promise {
        const url = this.makeUrl(this.basePath, PackageName, 'Sample1', 'API2');
        const headers = this.makeHeaders({'Content-Type': 'application/json'});
        const query = this.makeQuery({
            method: 'POST',
            headers,
            body: JSON.stringify(input)
        });
        const response = await fetch(url, query);
        return (await response.json()) as Sample1Output2;
    }

}
import * as Sample1 from './Sample1.proto';
export const PackageName = 'Sample2';
export interface Sample2Input
{
Value? : Sample1.Sample1Input;
}
export interface Sample2Output
{
Value? : string;
}
export interface Sample2
{
API1(input: Sample2Input) : Promise;
}
export class Sample2Client
implements Sample2
{
constructor(
private basePath: string
= '', // default
private makeUrl: (basePath: string, packageName: string, className:string, methodName: string) => string
= (b, _, c, m) => `${b}${c}/${m}`, // =default
private makeHeaders: (baseHeaders: {}) => {}
= (h) => h, // =default
private makeQuery: (baseQuery: {}) => {}
= (q) => q // =default
) {}
async API1 (input: Sample2Input) : Promise {
const url = this.makeUrl(this.basePath, PackageName, 'Sample2', 'API1');
const headers = this.makeHeaders({'Content-Type': 'application/json'});
const query = this.makeQuery({
method: 'POST',
headers,
body: JSON.stringify(input)
});
const response = await fetch(url, query);
return (await response.json()) as Sample2Output;
}
} こんな感じです。
protoで定義したmessageとserviceをそのままinterfaceにします。
ついでにserviceをfetchを使った通信処理で実装もしています。気が向けばXMLHttpRequest版とかPOST前提なところをなんとかするかもしれません。
(gRPCにはGETもPOSTもないから……)
実のところこの吐き出したソースをまだ試していないので実は動かないとかあるかもしれません。
そんな時はプルリを投げてくださるとマージすると思います。

