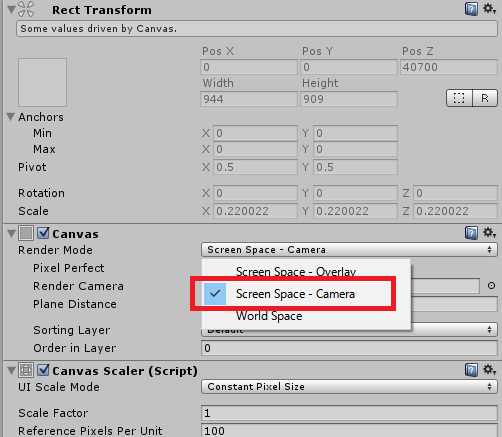
uGUIで自由なメッシュを表示するでuGUI用のメッシュの作り方をざっくり解説しました。
しかし、これにIPointerClickHandler等を利用してクリック(タッチ)判定をつけてもイマイチ思った動作をしません。
uGUIのクリック判定はメッシュのピクセルの情報を読み取って当たり判定を取ってくれたりとかはしません。
uGUIでのクリック判定の仕組み
uGUIでは「Canvas」についた、「GraphicRaycaster」が各オブジェクトがクリックされているかを判定しています。
GraphicRaycasterは子供の中から「Raycast Target」指定されたGraphicを探します。
そのGraphicの「RectTransform」のパラメータとクリック座標を比べて当たっているかどうかの判定が行われています。
つまりRectTransformの値を自分が作ったGraphicの内容と合致させなければ正しくクリック判定が出来ないわけです。
制約
上に書いた通りなので「当たり判定は長方形一つ」という制約がつきます。
クリック判定について
クリック判定には以下のスクリプトを使って確認しています。
using System;
using UnityEngine;
using UnityEngine.EventSystems;

/// <summary>
/// クリック判定
/// </summary>
public class MyGraphicClicker
    : MonoBehaviour
    , IPointerClickHandler
{
    /// <summary>
    /// クリック時のイベント
    /// </summary>
    /// <param name="eventData"></param>
    public void OnPointerClick( PointerEventData eventData )
    {
        Debug.Log( "クリックされたよ:" + gameObject.name );
    }
}
細かい内容は今回は割愛します。
RectTransformの設定
とりあえずそれを踏まえてRectTransformの設定をします。
using UnityEngine;
using UnityEngine.UI;

public class MyGraphic
    : Graphic
{
    protected override void OnPopulateMesh( VertexHelper vh )
    {
        vh.Clear();

        // 左上
        UIVertex lt = UIVertex.simpleVert;
        lt.position = new Vector3( -100, 100, 0 );
        lt.uv0 = new Vector2(0, 1);

        // 右上
        UIVertex rt = UIVertex.simpleVert;
        rt.position = new Vector3(100, 100, 0);
        rt.uv0 = new Vector2(1, 1);

        // 右下
        UIVertex rb = UIVertex.simpleVert;
        rb.position = new Vector3( 100, 0, 0 );
        rb.uv0 = new Vector2(1, 0);

        // 左下
        UIVertex lb = UIVertex.simpleVert;
        lb.position = new Vector3( -100, 0, 0 );
        lb.uv0 = new Vector2(0, 0);

        vh.AddUIVertexQuad( new UIVertex[] {
            lb, rb, rt, lt
        } );
    }
}
この縦100、横200の長方形についてRectTransformを設定します。
設定しなければいけないパラメータは
- Width、Height
- 頂点座標
の2つです。
WidthとHeight
WidthとHeightはその名のとおりオブジェクトの横幅と縦幅です。
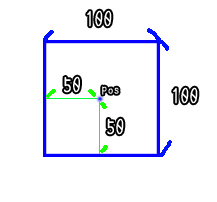
これはオブジェクトの座標を中心とした幅です。
座標が(0,0)、幅が(100,100)の場合は左に50、右に50、上に50、下に50の大きさです。
= (-50,-50) – (50, 50)
上のソースでは縦100、横200の長方形であるためその設定を行います。
幅の設定にはRectTransform#SetSizeWithCurrentAnchorsを利用します。
    protected override void Start()
    {
        rectTransform.SetSizeWithCurrentAnchors( RectTransform.Axis.Vertical, 100 );
        rectTransform.SetSizeWithCurrentAnchors( RectTransform.Axis.Horizontal, 200 );
    }
Startで幅を設定するようにしました。
これでWidthとHeightは正しくなったはずです。
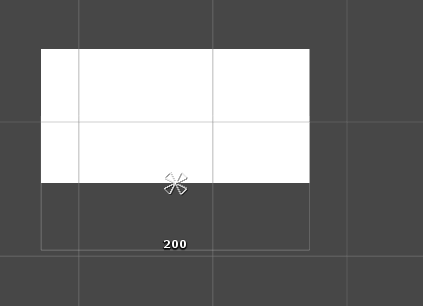
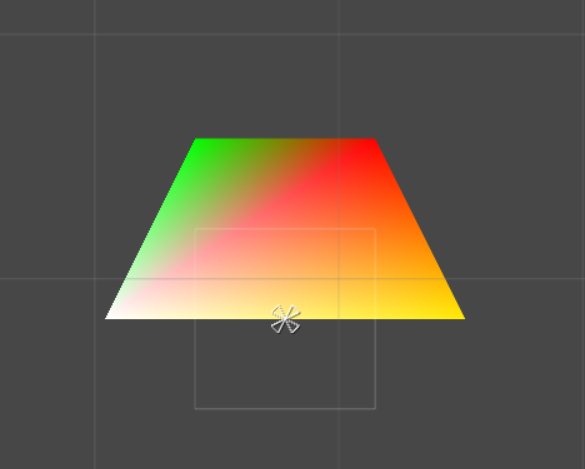
薄いグレーの線が出ていますが、これがこのオブジェクトの矩形です。
見てのとおり縦に半分ずれています。
頂点座標とPivot
上の画像のとおり縦にずれてしまっています。これは頂点座標がずれているからです。
では頂点座標はどこを基準にしているのでしょうか。
これはPivotを基準としています。頂点の座標はPivotから見てどの程度離れているかという座標なんです。
頂点の座標の指定が(0,0)の場合、Pivotが真ん中(=0.5,0.5)の時は真ん中に、Pivotが左上(=0,0)の時は左上に頂点が置かれます。
なので、Pivotの初期値を(0.5,0.5)を基準に頂点座標を変更します。
using UnityEngine;
using UnityEngine.UI;

public class MyGraphic
    : Graphic
{
    protected override void Start()
    {
        rectTransform.SetSizeWithCurrentAnchors( RectTransform.Axis.Vertical, 100 );
        rectTransform.SetSizeWithCurrentAnchors( RectTransform.Axis.Horizontal, 200 );
    }

    protected override void OnPopulateMesh( VertexHelper vh )
    {
        vh.Clear();

        // 左上
        UIVertex lt = UIVertex.simpleVert;
        lt.position = new Vector3( -100, 50, 0 );
        lt.uv0 = new Vector2(0, 1);

        // 右上
        UIVertex rt = UIVertex.simpleVert;
        rt.position = new Vector3(100, 50, 0);
        rt.uv0 = new Vector2(1, 1);

        // 右下
        UIVertex rb = UIVertex.simpleVert;
        rb.position = new Vector3( 100, -50, 0 );
        rb.uv0 = new Vector2(1, 0);

        // 左下
        UIVertex lb = UIVertex.simpleVert;
        lb.position = new Vector3( -100, -50, 0 );
        lb.uv0 = new Vector2(0, 0);

        vh.AddUIVertexQuad( new UIVertex[] {
            lb, rb, rt, lt
        } );
    }
}
yが0~100だったのが-50~50になりました。
これでRectTransformとメッシュが合ってます。
クリックしてみると反応するはずです。
Pivotが変わると…
ところがこの状態でPivotを変えるとずれます…前述のとおり頂点の(0,0)の基準が変わってしまうのですから当たり前です。
これは以下の計算式で対応する事が出来ます。
x’ = x + width / 2 – pivot.x * width
y’ = y + height / 2 – pivot.y * height
xとyは中央を基準としている前提でpivotが中央(0.5,0.5)から離れている分だけ座標を足してずらすという単純なものです。
using UnityEngine;
using UnityEngine.UI;

public class MyGraphic
    : Graphic
{
    protected override void Start()
    {
        rectTransform.SetSizeWithCurrentAnchors( RectTransform.Axis.Vertical, 100 );
        rectTransform.SetSizeWithCurrentAnchors( RectTransform.Axis.Horizontal, 200 );
    }

    private float CoordinateX( float x )
    {
        return x + rectTransform.rect.width * (0.5f - rectTransform.pivot.x);
    }

    private float CoordinateY( float y )
    {
        return y + rectTransform.rect.height * (0.5f - rectTransform.pivot.y);
    }

    private Vector3 Coordinate( Vector3 v )
    {
        return new Vector3( CoordinateX( v.x ), CoordinateY( v.y ), v.z );
    }

    protected override void OnPopulateMesh( VertexHelper vh )
    {
        vh.Clear();

        // 左上
        UIVertex lt = UIVertex.simpleVert;
        lt.position = Coordinate( new Vector3( -100, 50, 0 ) );
        lt.uv0 = new Vector2(0, 1);

        // 右上
        UIVertex rt = UIVertex.simpleVert;
        rt.position = Coordinate( new Vector3(100, 50, 0) );
        rt.uv0 = new Vector2(1, 1);

        // 右下
        UIVertex rb = UIVertex.simpleVert;
        rb.position = Coordinate( new Vector3( 100, -50, 0 ) );
        rb.uv0 = new Vector2(1, 0);

        // 左下
        UIVertex lb = UIVertex.simpleVert;
        lb.position = Coordinate( new Vector3( -100, -50, 0 ) );
        lb.uv0 = new Vector2(0, 0);

        vh.AddUIVertexQuad( new UIVertex[] {
            lb, rb, rt, lt
        } );
    }
}
Coordinateがそれです。(※掛け算の分配法則でまとめられるのでまとめてます。
x + width / 2 – pivot.x * width = x + width * 0.5 – pivot.x * width = x + width * {0.5 – pivot.x} )
試しにPivotの数値を色々変えてみてください。
座標が変わったりしているものの、メッシュとゲームオブジェクトの矩形にずれが出ないはずです。
課題
最初に書きましたが、RectTransformのパラメータを見ているため
- 長方形以外の形状
- 飛び地になったメッシュ
これらには対応できません。
次の記事でコレに対応します。