前の記事でuGUIの自分で作ったクリック判定の調整作業をざっくり書きました。
しかしこれには課題点がありました。
- 長方形以外の形状がダメ
- 飛び地がダメ
という2点です。
クリック判定について
クリック判定には前回と同じく以下のスクリプトを使って確認しています。
using System;
using UnityEngine;
using UnityEngine.EventSystems;

/// <summary>
/// クリック判定
/// </summary>
public class MyGraphicClicker
    : MonoBehaviour
    , IPointerClickHandler
{
    /// <summary>
    /// クリック時のイベント
    /// </summary>
    /// <param name="eventData"></param>
    public void OnPointerClick( PointerEventData eventData )
    {
        Debug.Log( "クリックされたよ:" + gameObject.name );
    }
}
改善方法
これは割と簡単に改善する事が出来ます。
それにはPhysics2Dを利用します。
Physics2Dの各Colliderは1つのオブジェクトに複数つけることが出来ます。
この記事でやること
以前のを編集して長方形を2つ表示するようにします。
using UnityEngine;
using UnityEngine.UI;

public class MyGraphic
    : Graphic
{
    protected override void Start()
    {
        rectTransform.SetSizeWithCurrentAnchors( RectTransform.Axis.Vertical, 100 );
        rectTransform.SetSizeWithCurrentAnchors( RectTransform.Axis.Horizontal, 200 );
    }

    private float CoordinateX( float x )
    {
        return x + rectTransform.rect.width * (0.5f - rectTransform.pivot.x);
    }

    private float CoordinateY( float y )
    {
        return y + rectTransform.rect.height * (0.5f - rectTransform.pivot.y);
    }

    private Vector3 Coordinate( Vector3 v )
    {
        return new Vector3( CoordinateX( v.x ), CoordinateY( v.y ), v.z );
    }

    protected override void OnPopulateMesh( VertexHelper vh )
    {
        vh.Clear();

        // 左上
        UIVertex lt = UIVertex.simpleVert;
        lt.position = Coordinate( new Vector3( -100, 50, 0 ) );
        lt.uv0 = new Vector2(0, 1);

        // 右上
        UIVertex rt = UIVertex.simpleVert;
        rt.position = Coordinate( new Vector3(100, 50, 0) );
        rt.uv0 = new Vector2(1, 1);

        // 右下
        UIVertex rb = UIVertex.simpleVert;
        rb.position = Coordinate( new Vector3( 100, -50, 0 ) );
        rb.uv0 = new Vector2(1, 0);

        // 左下
        UIVertex lb = UIVertex.simpleVert;
        lb.position = Coordinate( new Vector3( -100, -50, 0 ) );
        lb.uv0 = new Vector2(0, 0);

        vh.AddUIVertexQuad( new UIVertex[] {
            lb, rb, rt, lt
        } );

        // 200下にもう一つ
        lb.position.y -= 200;
        rb.position.y -= 200;
        rt.position.y -= 200;
        lt.position.y -= 200;

        vh.AddUIVertexQuad( new UIVertex[] {
            lb, rb, rt, lt
        } );
    }
}
これにBoxCollider2Dを2つ付けて飛び地でも正しく判定できるようにします。
Physics2Dの準備
まずはuGUIでPhysics2Dでのクリック判定を使えるようにします。
これには「Physics2DRayCaster」というのを用意する必要があります。
また、「Physics2DRayCaster」には「Camera」が必要です。
Camera用意
まずCameraを用意します。
新たにGameObjectを作ります。GameObjectはCanvasの子供にしないように注意してください。
作ったGameObjectにはPhysics2DRayCasterをAddComponentします。(Add Component → Event → Physics 2D Raycaster)

カメラの設定はProjectionをOrthographicにする点だけ注意が必要です。
カメラが作れたらuGUIにこれを設定します。
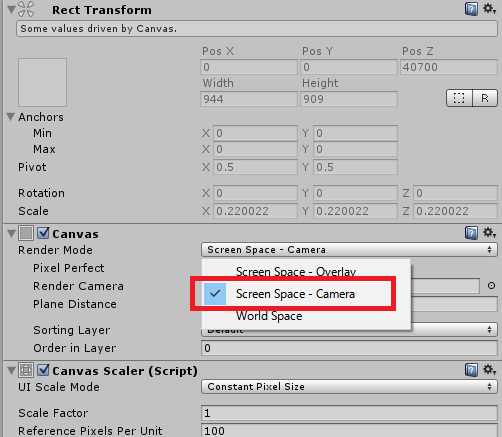
Canvasの「Render Mode」を「Screen Space – Camera」に変更し、「Render Camera」に先ほど作ったカメラをドラッグ&ドラッグで設定します。
これだけでPhysics2Dの準備は完了です。
ソースでBoxCollider2Dを付与する
では、表示されている四角に合わせてBoxCollider2Dを2つ付与します。
これは簡単です。AddComponentして数値を適宜入れるだけです。
    protected override void Start()
    {
        rectTransform.SetSizeWithCurrentAnchors( RectTransform.Axis.Vertical, 100 );
        rectTransform.SetSizeWithCurrentAnchors( RectTransform.Axis.Horizontal, 200 );

        // 上の四角
        var c = gameObject.AddComponent<BoxCollider2D>();
        c.offset = new Vector2( 0, 0 );
        c.size = new Vector2( 200, 100 );

        // 下の四角
        c = gameObject.AddComponent<BoxCollider2D>();
        c.offset = new Vector2( 0, -200 );
        c.size = new Vector2( 200, 100 );
    }
これだけです。
実際試してみると上下の四角でちゃんとログが出て、それ以外では反応しないと思います。